The state of Saxony recently released a huge dataset of LiDAR geodata to the public. These data consist of 3D point clouds representing the visible surface of the Earth and what ever is on it, buildings, vegetation, etc.
I used this release as a welcome occasion to revisit Blender and give a shot at visualizing parts of these data. In this post I am going to describe the workflow I used to visualize the point clouds. To get started we need:
The workflow will involve three steps:
- Getting the data
- Preparing the data for Blender
- Visualizing the data in Blender
Let’s get started.
Getting the data
Getting the data is straight forward. For this example we use one of the files offered here:
https://www.geodaten.sachsen.de/downloadbereich-lsc-4667.html.
Just select a tile from the map, download the compressed data set and unzip it. Since the uncompressed file is huge and contains a high resolution point cloud of 2 x 2 km in size, we’ll need to filter the data, before we can load it into Blender.
Preparing the data
In order to have a reasonably sized file to work with in Blender we need to reduce the amount of points in our data set. This is can be done by cropping the file to a smaller region of interest, thinning it out by using a lower resolution grid, or (most likely) a combination thereof.
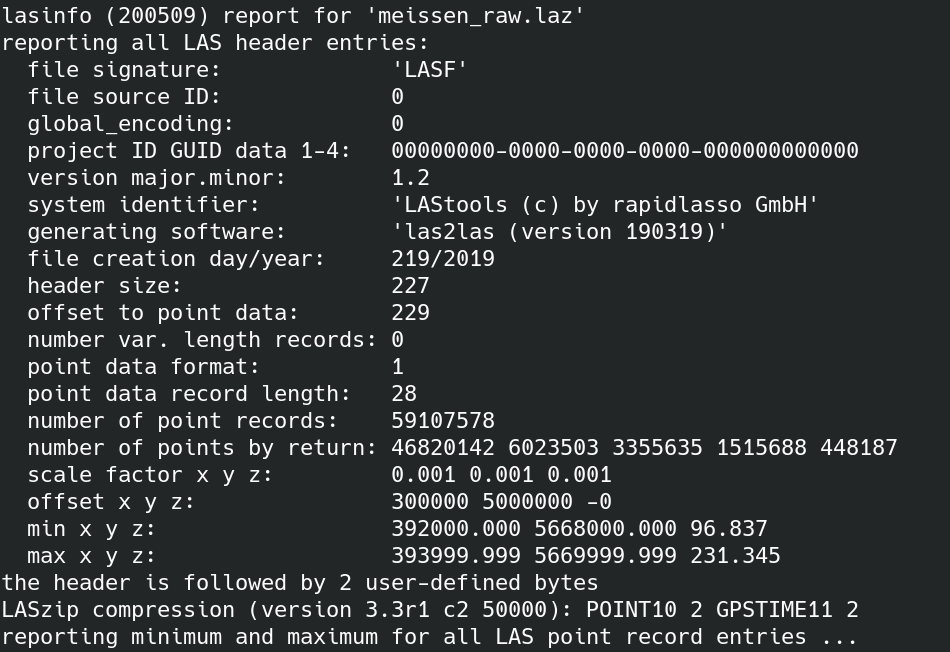
Before we can get started on reducing the data we need to be sure which part to crop. For this we use the lasinfo tool contained in LAStools:
lasinfo input.lazThis will parse the files header and output information about the geometry. Most importantly we care about the tiles min x and min y. The tiles width and height (in the Saxony data set linked above) are fixed to 2 km / 2.000 units.
In the next step we use las2las in order to create the filtered data set. In this example I extract a circular region and thin it out to a new grid. Note that I also translate the output in x and y direction so the data is not too far off center when importing into Blender later:
las2las -i meissen_raw.laz -o meissen_cropped.laz -thin_with_grid 0.1 -keep_circle 393223 5669310 290 -translate_x -392000 -translate_y -5668000This new file is then ready to be loaded into Blender. Again you can use lasinfo to check on the number of points contained and make sure it’s a reasonable number. For my aging desktop PC around 3 – 5 million points seemed to pose the limit of what Blender could handle.
In case you want to reduce your file further play with the cropped region of interest and the grid resolution parameters.
Visualizing in Blender
In Blender we will use Brian Hynd‘s LiDAR-Tools to open the cropped file. Find it here and install it.
With the plugin installed we can now read the las file by using File -> Import -> LiDAR Format.
This will add the point cloud as a new object. Center the object in front of your camera and scale it appropriately. Since the points themselves have no dimensions they will not show up on a render by default. To render the points we will have to give them substance, which we will achieve using Blender’s particle system.
Click on the point cloud object (by default called LiDARObj), go to the particle settings and add a particle system. Set it up using the following settings:
- Frame Start and Frame End both set to 0, since we want the particles to be created right away and not spawn over time.
- Lifetime set to a value as long as your render is going to be.
- Source -> Emit from -> Verts, to attach the particles to the points in the point cloud.
- Number of particles to what ever value your computer can handle, experiment.

Blender offers different way to render particles. I opted for rendering the particles as instances of an object. This allows to set up one object as the base object that will be rendered for every particle instance. By changing that object’s material we can therefore influence the overall look of the scene adding features like reflections and shadows.
To do this add a new object to the scene (can be a cube, icosphere, plane or whatever you prefer). Then in the particle system select Render -> Render As -> Object and select the object you just created as Instance Object. Don’t forget to move the object off camera, so it does not show up in your render.
Now press render and you should receive the first image of your point cloud.